 13 Main Street, #7, Sparta, NJ 07871
 973-729-5900
Congratulations on starting your Invisalign® journey in Sparta, New Jersey! To help our team at Anna Patras Orthodontics take better care of your treatment, we recommend downloading the MY INVISALIGN app from any app store. This will help our orthodontist keep updated on your progress and help personalize your treatment. Once downloading is complete, please follow the steps provided below to ensure a successful setup. You can also see our frequently asked questions below.
STEP 1: DOWNLOAD
Open up app store and download “MY INVISALIGN”
STEP 2: REGISTER
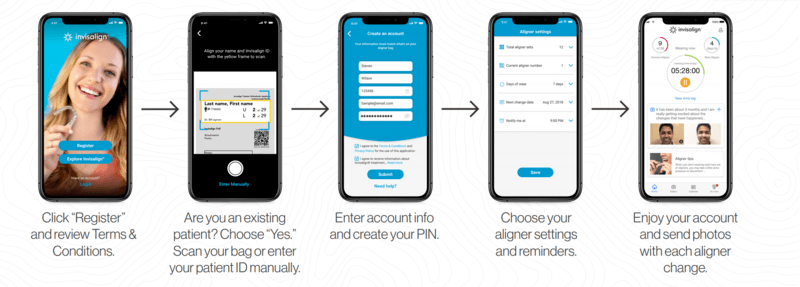
Click “Register” at the very bottom below the Login button.
STEP 3: VERIFY
Check the box below the screen if you are over the age of 13. If not, please have a parent/guardian in attendance to help assist your setup.
STEP 4: INVISALIGN START
Click Yes to “Have you started Invisalign treatment and picked up your aligners?” as you are currently in treatment as of right now!
STEP 5: REGISTER YOUR ALIGNER
Using the 1st aligner bag, you will first need the identify your patient Invisalign ID#. (Located below your first and last name).
OPTION 1: SCAN BAG
- You will need to allow access to your camera for this and following the instructions on the above screen on the app; take a photo of your name and patient ID# into the yellow rectangle.
- Once completed, please ensure that the required info replicates exactly what is printed on the bag before proceeding to the next field.
- Enter a Phone# (optional) and the same email that was given to the assistant. This will guarantee that the appropriate account will be l inked to your Invisalign ID.
- Create password
- Check off all (2) terms and conditions and privacy boxes.
OPTION 2: MANUAL
- You can also enter it manually but please ensure that the required info replicates exactly what is printed on the bag before proceeding to the next field.
- Enter a Phone# (optional) and the same email that was given to the assistant. This will guarantee that the appropriate account will be l inked to your Invisalign ID.
- Create password
- Check off all (2) terms and conditions and privacy boxes.
STEP 6: PIN
Input a four character pin. You will be using this pin to access your Invisalign app.
STEP 7: ALIGNER SETTINGS
If you were not automatically directed to the Aligner Settings page, enter into the home screen and click on the silhouette button on the top upper right corner; this is your Settings button. Once into settings, click into Aligner Settings.
*Note: Settings can be modified at any time as treatment instructions may change.
Total Aligner Stages:
this is your overall total of packages of Invisalign trays provided to you. You can find the number on each aligner bag or on the outside of your box. ex: U5 of 21 L5 of 21 * 21 will be the number you input.
Days of wear:
The days of wear are prescribed by the doctor and are always written on a label placed on your box. ex: 14 days
Current aligner stage:
The initial startup will always be “1”. However, if you are adjusting your settings due to a change in doctor instructions, input your current aligner number instead.
Next change date:
You will have to manually calculate when your next change out date is as the app sometimes does not automatically sync your dates of wear with your next change date calendar. ex: You inserted your first tray on April 5. 14 days from then will be April 19.
Notify me at:
Setting a reminder for when to change your aligners are especially helpful in making sure you change your trays on time. Find a time that works for you as to when to receive notifications.
SAVE
STEP 8: MY CARE
The MY CARE section allows for photo progress submissions for the doctor to view. Most of your follow up can be done through the app. However, you will still be required to have a scheduled routine visit to the office for the doctor to assess.
Photo submissions are requested prior to advancing into your next tray, preferably at the end of tray 1,2,5 and every 5th trays (10,15,20…) however, if you wish to submit more feel free to do so.
For the app to properly sync with your correct aligner number, please take photos the day BEFORE you’re about to switch into your aligners. ex: You started your aligners on a Monday for 1 week each. On the following Sunday you will take photos then instead of the Monday.
The MY CARE is also an interactive tool that allows for feedback from the doctor as well as any comments you may have regarding your treatment based on the photos you submit. To ensure that we get a better diagnosis of your photos we ask that you:
-
- Wear your cheek retractor whenever you take photos. This allows for a better viewing of your teeth.
- Include as much of your teeth i n the photo as you can. e specially the back molars for the l eft and right photos.
- Try to prevent taking blurry/fuzzy photos. To avoid this, we recommend taking photos in a well-lit room, during the daytime or using a light source to shine into the mouth for photos to appear brighter.
Frequently Asked Questions
What is My Care and how do I access this feature?
The My Care feature allows users to send photos of their Invisalign treatment progress to their doctor and receive feedback via the Invisalign Virtual Care capability. This feature is only available by invitation from your doctor. Once you receive and accept the invitation, you will be able to access the My Care feature.
How often should I send progress photos to my doctor?
You will receive a push notification when it is time to change to your next aligner. This is to remind you to send in a full set of progress photos and videos to your doctor.
Can I send in an incomplete set of photos?
A full set of progress photos allows your doctor to make a complete assessment of your progress tracking by viewing various angles of your teeth. While incomplete sets can be sent, it is advised that patients send complete sets to keep their new smile on track.
How do I take photos?
Once you enter the photo-taking flow, simply follow the instructions provided in each screen and place your teeth with the cheek retractors within the guidance box. Once the camera of your phone detects your teeth in the box, it will take the photo via an automatic 3-second countdown.
How do I communicate with my doctor through the app?
Within Invisalign Virtual Care, you are able to communicate with your doctor through the free-text field. This is only for you to exchange communication with your doctor. Align Technology does not engage in or hold responsibility to monitor the exchange of communication between you and your doctor and is not responsible for the content and exchanges between you and the doctor.
Will I receive reminder notifications?
Yes, if you opted to receive notifications. You will receive push notifications for the following:
- When it’s time for you to send progress photos to your doctor and advance to your next aligner.
- When your doctor sends “On Track” feedback to you.
- When your doctor sends new instruction to you.
- If you do not receive any notifications and would like to, please ensure that the notifications settings on your device are enabled. If you did not initially authorize notifications when registering for the My Invisalign app, you may need to update the notification settings in your phone. Please consult your manufacturer if you need assistance with finding this information, or if you have any other questions concerning your device’s settings.
How are reminder notifications triggered?
Notifications for taking and sending progress photos are triggered when you enter the required fields in the aligner settings.
If you have any questions or concerns, please do not hesitate to contact our office at 973-729-5900.